Building a Simple Blog App with Python and Flask.
Build a blog platform with me using the Flask framework: create, retrieve, update and destroy posts (the simple crud).


Hello and Welcome 👋,
In this guide, we will use Flask with the Jinja2 templating engine and the SQLite database engine to build our platform.
Flask is a lightweight WSGI web application framework. This means flask provides you with tools, libraries and technologies that allow you to build a web application. It is classified as a microframework because it does not require particular tools or libraries.
Jinja2 is a modern-day templating language for Python developers. It allows us to insert code similar to python syntax into HTML templates.
You can view the repository of this project here.
This post might not be what you need if you are new to Python, Flask and web development.
Objectives
Create and set up an environment.
Set up and run Flask App locally.
Create user and post DB models.
Create the database.
Create the home endpoint.
User authentication and password hashing using werkzeug security.
Create the CRUD endpoints and functionality.
Setting up our environment
A virtual environment is a tool that helps to keep dependencies required by different projects separate by creating isolated python virtual environments for them.
Let's create and activate one:
After you have created and navigated into your project folder, run this command on your VScode or CLI terminal to create the virtual environment.
python -m venv <env name>
<env name>/Scripts/Activate
Let's install the requirements for this project:
You can copy the requirements below and paste them into a 'requirements.txt' file in your project root.
click==8.1.3
colorama==0.4.6
Flask==2.2.2
Flask-Login==0.6.2
Flask-SQLAlchemy==3.0.2
greenlet==1.1.3.post0
itsdangerous==2.1.2
Jinja2==3.1.2
MarkupSafe==2.1.1
python-dotenv==0.21.0
SQLAlchemy==1.4.42
Werkzeug==2.2.2
then:
pip install -r requirements.txt
Or just,
pip install Flask, Flask-SQLAlchemy, python-dotenv, Werkzeug
Most of the dependencies will be installed with Flask.
Setting up our Flask App
Create an app.py file, import flask and declare the flask app:
from flask import Flask

app = Flask(__name__)

if __name__=="__main__":
    app.run(debug=True)
We can run the app by executing python app.py on the terminal. You get a result similar to this after running the app:
* Serving Flask app 'app'
 * Debug mode: on
WARNING: This is a development server. Do not use it in a production deployment. Use a production WSGI server instead.
 * Running on http://127.0.0.1:5000
Press CTRL+C to quit
 * Restarting with stat
 * Debugger is active!
 * Debugger PIN: <Debugger PIN>
Open the URL, "http://127.0.0.1:5000" on your browser but you be getting this:
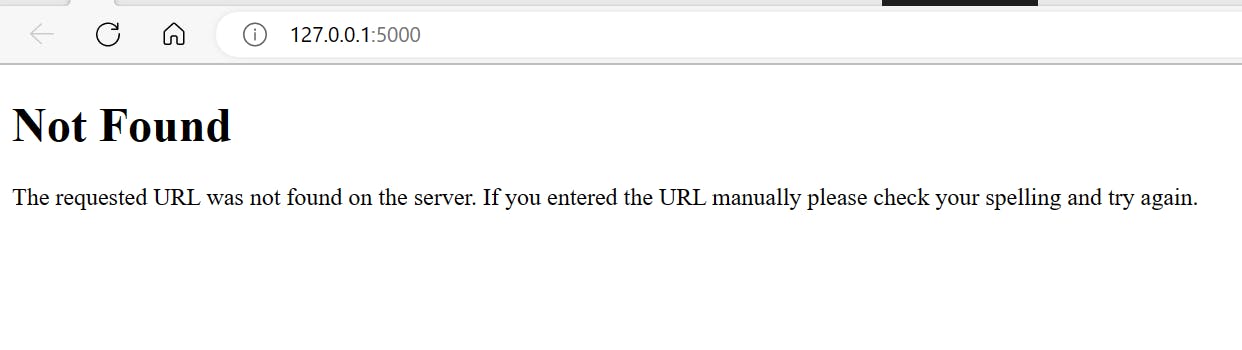
..since we don't have any routes in our app yet.
Create a .env file in your base directory and add a SECRET_KEY in it.
SECRET_KEY=fc024bc170533d234bfb7caa
Add the SQLALCHEMY_DATABASE_URI, SECRET_KEY and SQLALCHEMY_TRACK_MODIFICATIONS configurations for the app by updating the app.py file so we have this:
from flask import Flask, flash
from datetime import datetime
from flask_sqlalchemy import SQLAlchemy
# routes imports
from werkzeug.security import generate_password_hash, check_password_hash
from flask_login import login_user, LoginManager, UserMixin, logout_user, login_required
from flask import (render_template, url_for,
    redirect, request, abort)
from flask_login import current_user

import os
from dotenv import load_dotenv

load_dotenv()
base_dir = os.path.dirname(os.path.realpath(__file__))

app = Flask(__name__)

app.config["SQLALCHEMY_DATABASE_URI"]='sqlite:///' + os.path.join(base_dir,'blog.db')
app.config['SECRET_KEY'] = os.environ.get('SECRET_KEY')
app.config['SQLALCHEMY_TRACK_MODIFICATIONS'] = False


if __name__=="__main__":
    app.run(debug=True)
All of these imports will be used in later endpoints.
Let's go ahead and create the models for the users and posts since the routes for the blog depend on them.
Creating the User and Post Models
Models are Python objects used to define a kind of data, with its attributes as data fields.
Flask-SQLAlchemy is an extension for Flask that adds support for SQLAlchemy to your application.
SQLAlchemy is an SQL toolkit that provides efficient and high-performing database access for relational databases.
Import SQLAlchemy from flask_sqlalchemy, one of the dependencies installed earlier in the virtual environment, and define an instance of SQLAlchemy taking 'app' as the argument.
To define the User model, also import the UserMixin from flask_login.
UserMixin class provides the implementation of some properties. It is the reason you can call for example is_authenticated to check if the login credentials provided are correct or not instead of having to write a method to do that yourself.
Define the User and Post models by inheriting db.Model, and UserMixin for the User Model.
db = SQLAlchemy(app)
login_manager = LoginManager(app)

class User(db.Model, UserMixin):
    id = db.Column(db.Integer(), primary_key=True)
    username = db.Column(db.String(20), unique=True, nullable=False)
    email = db.Column(db.String(120), unique=True, nullable=False)
    password = db.Column(db.String(60), nullable=False)
    posts = db.relationship('Post', backref='author', lazy=True)

    def __repr__(self):
        return f"User('{self.username}', '{self.email}')"

class Post(db.Model):
    id = db.Column(db.Integer, primary_key=True)
    title = db.Column(db.String(100), nullable=False)
    date_posted = db.Column(db.DateTime, nullable=False, default=datetime.utcnow)
    content = db.Column(db.Text, nullable=False)
    user_id = db.Column(db.Integer, db.ForeignKey('user.id'), nullable=False)

    def __repr__(self):
        return f"Post('{self.title}', '{self.date_posted}')"

if __name__=="__main__":
    app.run(debug=True)
Creating the Database
Now that the database connection has been set and defined and the models have been created, use the Flask shell to create the database and the model tables based on the model fields.
With the virtual environment activated, set the app.py file as your Flask application using the FLASK_APP environment variable. Then open the Flask shell using the following command in your flask_app directory:
User@TASLIM-DESKTOP(master)
$ export FLASK_APP=app
(env)
User@TASLIM-DESKTOP(master)
$ flask shell
Then create the database tables:
>>> from app import db
>>> db.create_all()
A new file with the name blog.db will be created in the base directory.
The name of the file is as a result the name set with app.config["SQLALCHEMY_DATABASE_URI"]='sqlite:///' + os.path.join(base_dir,'blog.db') .
The database tables can also be populated from the terminal by creating instances of the models after importing them from app:
>>> from app import db, User, Post
>>> user1 = User(username='Taslim',email='taslim@mail.com',password='********')
>>> db.session.add(user1)
>>> db.session.commit()
More User and Post can be added the same way.
Creating the Home Endpoint
In the base directory, where the app.py file is, create a folder named templates. All templates will be created in this new folder.
Just below the models, create the home endpoint that returns all posts and renders them in an HTML template.
@app.route("/home")
@app.route("/")
def home():
    posts = Post.query.all()
    return render_template('home.html', posts=posts)
The value of posts variable will be passed into the HTML page and can be worked with.
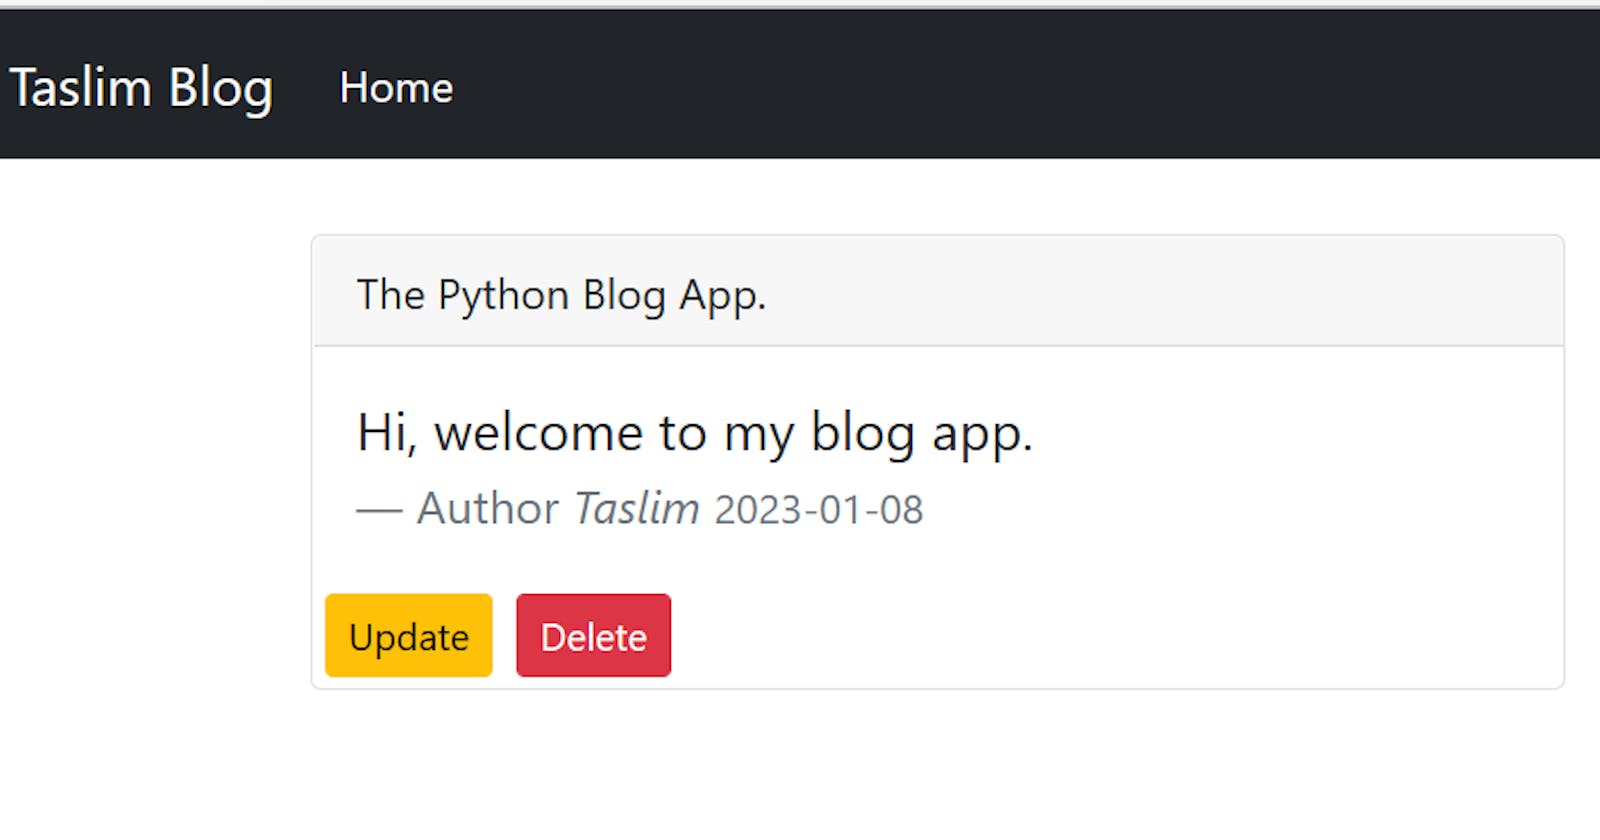
Create a new HTML file in the templates folder, home.html and edit it to return all posts. Any style can be added but I used bootstrap to style mine.
{% for post in posts %}
    <div class="card col-md-6 mt-4">
        <div class="card-header">
            <h5><a href="{{ url_for('post', post_id=post.id) }}" class="article-title">{{ post.title }}</a></h5>
        </div>
        <div class="card-body">
        <blockquote class="blockquote mb-0">
            <p>{{ post.content }}</p>
            <footer class="blockquote-footer">Author <cite title="Source Title">{{ post.author.username }} </cite><small class="text-muted">{{ post.date_posted.strftime('%Y-%m-%d') }}</small></footer>
        </blockquote>
        </div>
    </div>
{% endfor %}
Jinja2 allows code to be written in python syntax. The {% %} is used to evaluate data and {{ }} is used to print data. Each post data can be accessed from the for loop and have their field values displayed with post.<field>.
User Authentication
We have the User model and users can be created, but we have to authenticate a user instance so it has the right authorizations.
Werkzueg security will be used to hash password and check password hash.
We will create the Login and Signup pages, but let's clear the db data since the user added previously had a plain text password. You can simply remove the instance of the user by running a query but there is no much data, so far.
On the terminal, run:
>>> from app import db
>>> db.drop_all()
>>> db.create_all()
The Signup endpoint will be written this way. The form data from the html template, which we have not yet created, will be passed to this endpoint.
The endpoint also checks the unique constraints on username and email fields and adds the user based on the form values if the constriants are not violated, then redirects to the login page.
Import flash, redirect and request from flask
@app.route('/register', methods=['GET', 'POST'])
def register():
    if request.method == 'POST':
        username = request.form.get('username')
        email = request.form.get('email')
        password = request.form.get('password')
        confirm_password = request.form.get('confirm')
        user_name = User.query.filter_by(username=username).first()
        user_email = User.query.filter_by(email=email).first()
        if user_name:
            flash('username already exists!', 'danger')
        elif user_email:
            email_error = 'email already exists!'
            flash(email_error, 'danger')
        else:
            password_hash = generate_password_hash(password)
            if check_password_hash(password_hash, confirm_password):
                new_user = User(username=username, email=email, password=password_hash)
                db.session.add(new_user)
                db.session.commit()
                flash(f'Your account has been created! You can now log in', 'success')

                return redirect(url_for('login'))

    return render_template('register.html', errors={
            'username':username_error,
            'email' : email_error
        })
Create a file named register.html in the templates folder and edit it to look similar to this:
<form action="{{url_for('register')}}" method="POST">
  <div class="form-group">
    <h3>Create an Account</h3>
  </div>
  <div class="form-group col-md-6 form-label">
    <input type="text" name="username" placeholder="username" class="form-control" value="{{ username }}"/>
  </div>
  <div class="form-group col-md-6 form-label">
    <input type="email" name="email" placeholder="email" class="form-control" value="{{ email }}"/>
  </div>
  <div class="form-group col-md-6 form-label">
    <input type="password" name="password" placeholder="password" class="form-control"/>
  </div>
  <div class="form-group col-md-6 form-label">
    <input type="password" name="confirm" placeholder="confirm password" class="form-control"/>
  </div>
  <div class="form-group">
    <input type="submit" value="Sign Up" class="btn btn-success btn-sm sign-up"/>
  </div>
  <div class="form-group">
    <small>
      Already have an account? <a href="{{url_for('login')}}">Log In</a>
    </small>
  </div>
</form>
The Login enpoint:
@app.route('/login', methods=['GET', 'POST'])
def login():
    username = request.form.get('username')
    password = request.form.get('password')
    if username and password:
        user = User.query.filter_by(username=username).first()
        if user and check_password_hash(user.password, password):
            login_user(user)
            flash(f"You are logged in as {current_user.username}!", 'success')
            return redirect(url_for('home'))
        else:
            flash('Login unsuccessful. Please check your inputs!', 'danger')
    return render_template('login.html')
The login.html template will be similar to the SignUp page.
Then, a logout route:
@app.route('/logout')
def logout():
    user = current_user
    flash(f"You logged out {user.username}!", 'success')
    logout_user()
    return redirect(url_for('home'))